Digitizing Your Favorite Dog Embroidery Patterns: From Sketch to Punching
Embroidery has evolved into a captivating blend of artistry and technology, providing enthusiasts with a canvas to express their creativity. For dog lovers and embroidery enthusiasts alike, the process of digitizing dog embroidery patterns can be both rewarding and enjoyable.
In this comprehensive guide, we will delve into the intricate journey of transforming your favorite dog designs from a simple sketch to a digital format ready for the embroidery digitizing machine.
Table of Content:
1. Introduction to Digitizing Dog Embroidery Patterns
2. Gathering Inspiration: Choosing Your Favorite Dog Designs
3. Sketching Your Dog Embroidery Design
4. Understanding the Basics of Digitization
5. Tracing and Defining Elements
6. Adding Color and Texture
7. Testing and Refining
8. Exporting and Machine Setup
9. Bringing Your Dog Design to Life
10. Finishing Touches and Display
1. Introduction to Digitizing Dog Embroidery Patterns
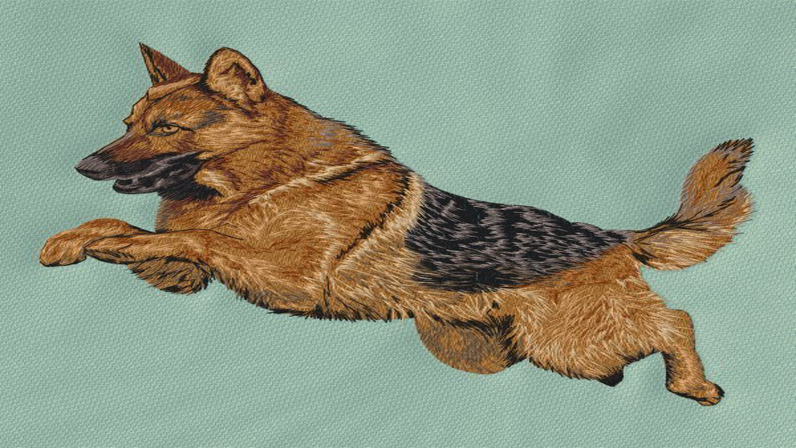
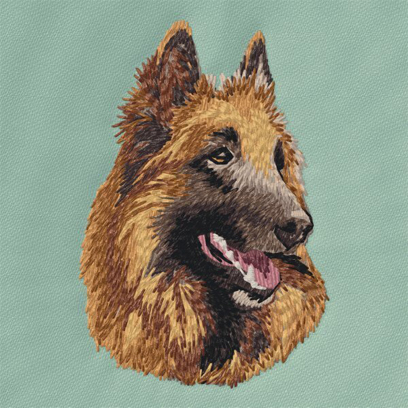
Embarking on the digitization journey requires a fundamental understanding of the process. Digitizing involves translating a visual design into a language that an embroidery machine comprehends. This process enables the machine to recreate intricate details with precision. For dog embroidery patterns, the key lies in preserving the unique characteristics of each breed, ensuring a lifelike representation in the final stitched product.
2. Gathering Inspiration: Choosing Your Favorite Dog Designs
Before diving into the technicalities of digitizing, it's essential to choose dog designs that resonate with your preferences. Whether you fancy the elegance of a Greyhound or the playful charm of a Corgi, selecting designs that evoke a personal connection will make the embroidery digitization process more enjoyable.
Consider browsing through dog breed books, online resources, or even your own pet photographs for inspiration. Take note of the distinctive features that make each breed special, as these details will play a crucial role in the digitization process.
3. Sketching Your Dog Embroidery Design
Once you've selected your favorite dog design, it's time to bring it to life on paper. Sketching allows you to capture the essence of the design and plan the placement of stitches. Focus on outlining key features such as the eyes, nose, ears, and any unique markings that define the breed.
Keep in mind that simplicity often enhances the effectiveness of embroidery designs. Clean lines and well-defined shapes will make the digitization process smoother and result in a more visually appealing finished product.
4. Understanding the Basics of Digitization
Digitizing requires specialized software that enables you to convert your hand-drawn sketch into a format suitable for embroidery machines. Familiarize yourself with popular digitizing software such as Wilcom, Embird, or Hatch, each offering unique tools and features.
Start by importing your sketched design into the software. Adjust the size and orientation as needed, ensuring it fits within the embroidery hoop dimensions. The software provides a virtual workspace where you can meticulously digitize each element of your design, assigning stitches to different areas for color and texture.
5. Tracing and Defining Elements
Digitizing involves breaking down your design into individual elements and assigning stitches to each component. Begin by tracing the outline of the dog, emphasizing key features. Pay close attention to areas that require intricate details, such as fur texture or facial expressions.
Use the software's tools to define stitch types, lengths, and densities. Experiment with different stitch patterns to achieve the desired texture and appearance. Remember that practice plays a vital role in mastering the art of digitization, so don't hesitate to refine your skills through trial and error.
6. Adding Color and Texture
One of the advantages of digitizing is the ability to infuse vibrant colors and textures into your embroidery designs. Experiment with the color palette provided by the software, matching shades to your vision for the final product. Consider the play of light and shadow on the dog's fur, using different stitch densities to create depth and realism.
Take advantage of features such as gradient fills and shading to add dimension to your design. The goal is to create a digital representation that not only captures the essence of the dog but also showcases your artistic flair.
7. Testing and Refining
Before transferring your digitized design to the embroidery machine, it's crucial to conduct tests to ensure optimal results. Most digitizing software allows you to simulate the stitching process, providing insights into how the final product will appear. Pay attention to any areas that may require adjustments, such as thread tension, stitch density, or color blending.
Refining your digitized design based on test results is a continuous process. Don't hesitate to make necessary modifications to achieve the best possible outcome.
8. Exporting and Machine Setup
Once satisfied with your digitized design, it's time to export the file in a format compatible with your embroidery machine. Common formats include .pes, .dst, and .exp. Consult your machine's manual to determine the preferred file type.
Prepare your embroidery machine by selecting the appropriate hoop size and thread colors. Load the digitized file onto a USB drive or transfer it directly to the machine, ensuring a seamless connection between your digital creation and the physical embroidery process.
9. Bringing Your Dog Design to Life
With the embroidery machine set up and your digitized design ready, it's time to witness the transformation from digital to tangible art. Secure the fabric in the hoop, thread the machine, and press start. Watch in awe as the machine meticulously recreates your favorite dog design with precision and detail.
10. Finishing Touches and Display
Once the embroidery digitizing machine completes its work, carefully remove the fabric from the hoop. Trim any excess threads and inspect the final product for any imperfections. If necessary, make minor touch-ups by hand to enhance details or correct any stitching irregularities.
Consider framing your embroidered masterpiece or incorporating it into a larger project such as a quilt or decorative pillow. Your digitized dog design is now a tangible expression of creativity, ready to be admired and cherished.
0 Comments